Java Lesson 3 – Creating Classes

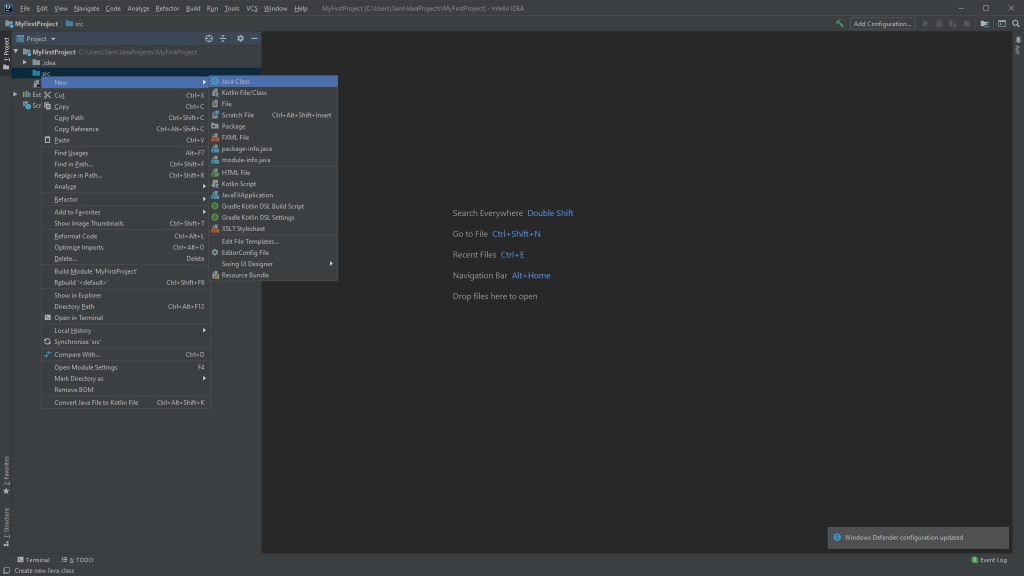
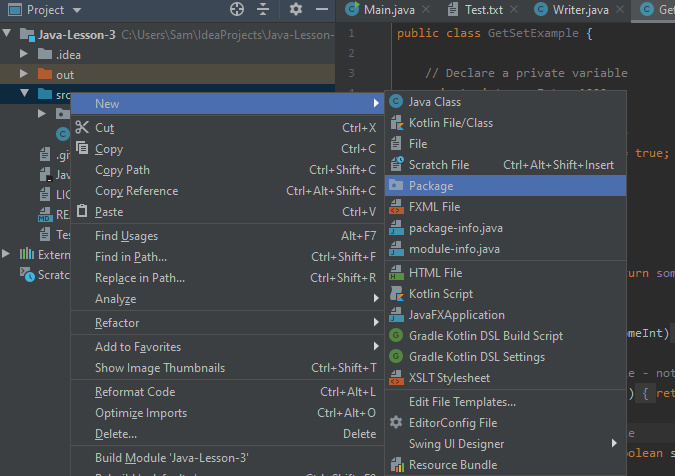
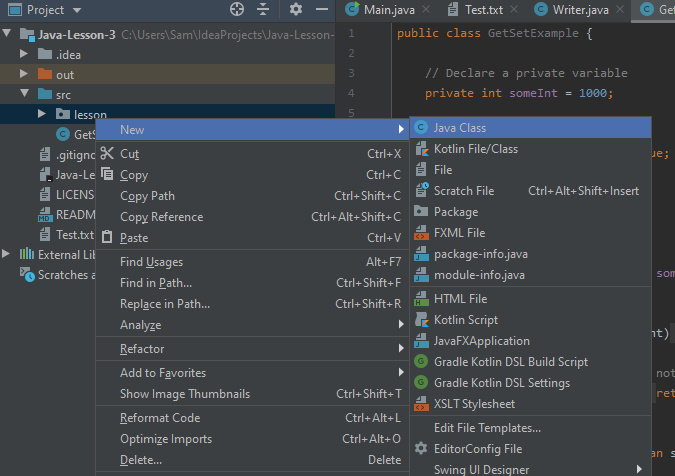
Today we will be covering the creation of classes and then using them in combination with each other. Firstly, we’re going to want to create a package in the IDE. You can do this by right-clicking the “src” directory in the project exporer and selecting “new->package”.

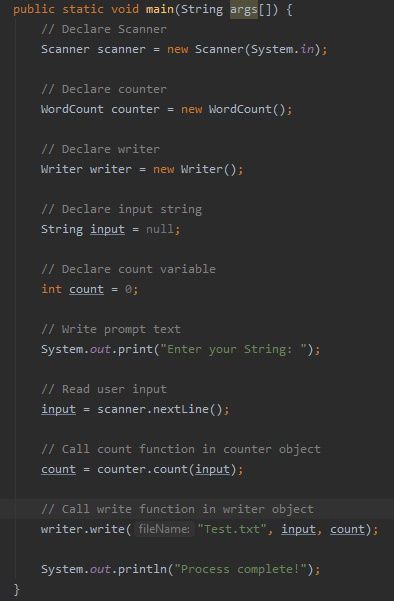
Once we have the package we will be ready to create some classes. For this tutorial we will make an application that allows users to enter a string, then counts the number of words in the string they entered and finally writes the string and the word count to the file.

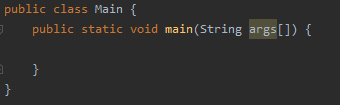
We will start by creating the class to house the main function:

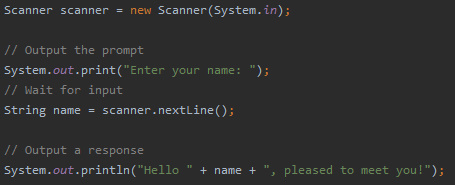
In this class we will put the main function that we’ve seen before and fill it with code to prompt users to enter a string in the console.

Now we need to create a class to handle the counting of the words in the string. To do this we create a class as before. We will then want to add a constructor for the class, this is the function that allows the class to be instantiated. Essentially, it is the function that is called when you say ” = new Object()”.

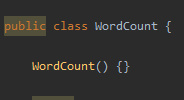
For this class we can leave it blank, but if your class has fields (variables) in, you may want to pass values to the constructor to initialise these fields.

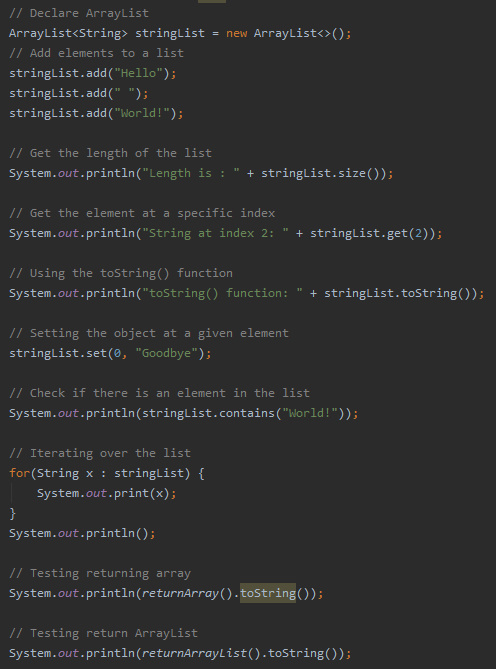
Next we want to write a function that counts the number of words in the String. To do this we are going to use the “.split()” method available to strings. We discussed this last time and with our knowledge of arrays and ArrayLists we can now demonstrate splitting.

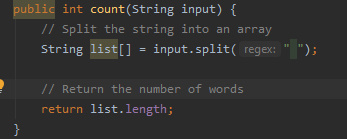
The above code works by splitting the string by the ” ” character, and storing each of the newly formed strings in an array. Since we are only counting words, there is no need to worry about punctuation.

We then simply return the length of the array – simple!

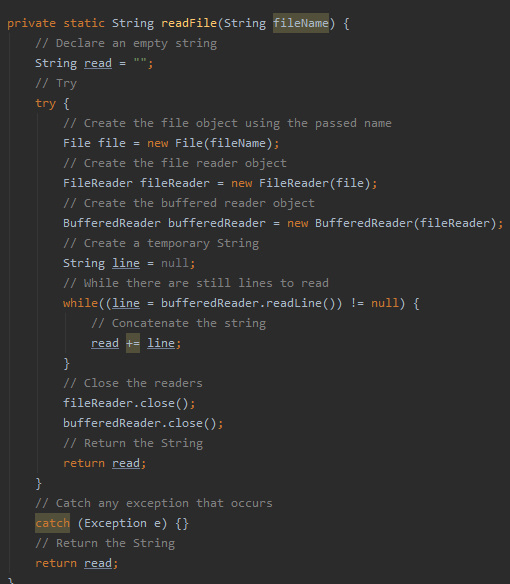
So now we have the word counting class, we just need the file writer class as we saw last time. By creating a new class and copying the function from last time in we are all set to finish our main function (see above). And that’s a simple application to get an input string and count the words and write the information to a file.

Garbage Collection

Before we end this weeks lesson, we are going to go over a couple more parts of Java. Firstly, we will look at the trash collector.

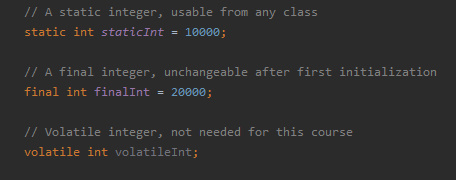
When running your applications, you’ll be declaring many variables and objects. In a language like C++ these will remain in memory until you specifically remove them. Fortunately for us, Java will automatically remove objects that are unreferenced in the executing code – which aids your memory use.

It is incredibly helpful, particularly if you’re new to programming. If you’d like to understand more about how the garbage collector works, there is plenty of helpful material available online.

Access Modifiers

Next we will discuss issues with access modifiers. As we saw in previous lessons, private functions and variables are inaccessible to from other classes. Whilst this can make your application more secure, it can be inconvenient if you want to access/modify a variable from a different class. The solution – getters and setters.

Getters and setters are a specific type of function with a singular purpose. A getter function will take the form “get[VARIABLE_NAME]()” and will simply return the variable.

A setter with take the form “set[VARIABLE_NAME](VAR_TYPE newVal)” and will set the chosen variable to the passed value.

Next time

Next time we will be looking at abstraction, creating abstract classes, inheritance and how to inherit from abstract classes and examining the uses of these two concepts in your applications.

Java Lesson 2 – Useful Classes

Primitives as Objects

Last time we saw that Java had access to several primitive data types. One could argue that the presence of these primitives means that Java is technically not a pure object-oriented language. Fortunately, Java actually has objects for the primitives built in. This offers special functions that you can use when working with these data types.

Some examples are shown below:

Note that they are being declared like objects and not like the primitives we saw last time:

The benefits of this are that these object will work with the abstract “Object” class in Java which means you can create a collection with various data types packaged together, but we’ll come to that later.

Strings

Strings are a vital part of any application. You can use them to store information, to write out sentences to the console or even to save data to a file. In Java, strings are objects which have many powerful functions, we’ll cover a few of these now.

Comparing two strings for a match is done with the “.equals(OTHER_STRING)” but you can also use pattern matching in the form of regular expressions (RegEx). This kind of thing can be plugged in for the condition in a conditional statement we saw last time.

String splitting allows you to split a string into an array of strings using a given delimiter. This is particularly useful for reading in data from a file such as a “.csv” file, where all the attributes are separated by a comma.

You can also get the substring of a string by treating the string as essentially and array of characters.

Java allows you to really easily concatenate strings, and this is exceptionally useful when building your applications.

ArrayLists

Arrays are a part of many programming languages, you’ll probably have come across them if you’ve done any C/C++. However arrays require you to specify a size in advance, and increasing that size after the array has been initialized can be quite cumbersome. Fortunately, Java has ArrayLists, which allow you to package groups of objects together.

You can add, remove and set elements of an an ArrayList without having to modify the size of the list. Since ArrayLists are also objects, you can return them from a function, unlike arrays.

This is because when you return an array, you are actually returning the address that the array is stored at, which is not what you want necessarily.

As discussed last time, Java has a for each loop, which allows you to iterate over a collection of objects. This is particularly useful for searching for values in your ArrayLists.

Scanner Class

Lastly we’re going to cover some input/output classes that will come in handy when developing in Java. Firstly will start with input/output to the console.
We saw last time how to output to the console.

But how would be get user input in the console? This can be done using a Scanner object.

This allows us to collect the input from the console. Now you have a method of having the user interact with the applications you develop, you can begin to make some more advanced programs.

File Handling

It is also useful to be able to read/write data to and from the disk, this is where file handling comes in. There are many ways to implement file reading and writing in Java, a cursory glance at a Google search will tell you that. For the purposes of this tutorial we’ll be covering reading and writing to text files using buffered readers and buffered writers.

This function takes the filename of the file we want to read and returns the contents of the “.txt” file in the form of a String.

This function takes the filename of the file we want to write to and a String that we want to store and writes the string to the given file.

Next Time

Next time we will be looking at creating classes, introducing constructors and the garbage collector, demonstrating the access modifiers we discussed previously and getters and setters.

Java Lesson 1 – The Basics

Last time we set up the IDE and the JDK so that we’re ready to create Java programs. In this tutorial we will be looking at declaring variables, loops and conditional statements, the naming convention in Java, access modifiers and how to comment your code. If you haven’t gone through that tutorial, I would strongly advise doing so to ensure you are all up to speed here.

Primitives in Java

There are technically 9 primitive data types in Java, those being:

  • byte – This is 8-bits in size which can represent an integer in the range of -128 to 127
  • char – This is 16-bits in size which can take a minimum value of 0 and a maximum of 65,535 and is used to represent any Unicode character
  • short – This is 16-bits in size that represents integers in the range -32,768 to 32,767
  • int – This is 32-bits in size that represents integers in the range -2,147,483,648 to 2,147,483,647
  • long – This is 64-bits in size that represents integers in the range -9,223,372,036,854,775,808 to +9,223,372,036,854,775,807
  • float – This is 32-bits in size and represents a single precision floating point (decimal) number. This means it can represent decimal numbers in the range 3.402,823,5 e^38 to 1.4 e^-45
  • double – This is 64-bits in size and represents a double precision floating point (decimal) number. This means it can represent decimal numbers in the range 1.797,693,134,862,315,7 e^308 to 4.9 e^-324
  • boolean – This is a simple flag variable that can take the value true or false
  • null – This represents a null value, useful if something doesn’t exist (Though we cannot declare a variable of type null)

Now that we’ve been introduced to the primitives in Java, let’s take a look at how these would look in Java:

The code for this example is all available on the GitHub (link at the top) so feel free to download it and have a play, or better yet follow along with the YouTube tutorial and make your own.

Variable Modifiers

Variables can also have different modifiers that change the way they behave in a program. Those modifiers are:

  • static – This can be used to create universal variables, that means you don’t need to create an object to use them
  • final – This prevents the variable being reinitialized after the first initialization
  • volatile – This aims to adress visibility problems with the variable

Whilst there are other modifiers in the Java language, only these three apply to variables in Java.

Conditional Statements

Next we will be taking a look at conditional or “control” statements in Java. They include:

  • if – This is used to specify whether a block of code should be executed depending on the condition being true.
  • else – This can be used in conjunction with an if statement, and will run if the condition is false.
  • else if – This can also be used in conjunction with an if statement, and can be used to check a second condition if the prior checks have failed.
  • switch – This is used to specify many alternative blocks of code that will be executed depending on the condition.

But all of these statements require the use of logical conditions:

  • a < b – a is less than b
  • a > b – a is greater than b
  • a <= b – a is less than or equal to b
  • a >= b – a is greater than or equal to b
  • a == b – a is equal to b
  • a != b – a is not equal to b

In addition to these conditions, you can chain conditions together using logical operators:

  • && – AND
  • || – OR
  • ^ – XOR

Below is an example of an “if” statement. It checks if the condition is true, and if it is, it executes the code in its block.

Next is an example of an “else” which is used after the “if” statement we just saw:

Then the “else if”:

The “switch” statement has a completely different syntax, but don’t worry, it’s quite logical when you read it:

You can see that depending on what the input is, a different block of code will be executed. It is important to remember that you need to “break” after the block of code so that the program can exit the “switch” statement.

There is also the “default” branch, which executes if the “switch” doesn’t recognize the input.

Loops

Next we will be taking a look at loops in Java. There are three loops available in Java, those being:

  • for loop
  • while loop
  • do while loop

The “for” loop is used to iterate over a set range of values, or even a collection of objects (we’ll get on to this in the future). You can see an example “for” loop below:

It works by declaring a variable (in this case “i”) and then specifying the stopping criteria of the loop in the form of a conditional. Lastly you have to define the step for the variable.

The “while” loop will iterate indefinitely until the condition changes. An example is shown below:

As you can see the loop will keep iterating until the boolean it is checking is updated.

The “do while” loop is similar to the “while” loop, however this variant guarantees the loop will be executed at least once. This is because the condition checking is done at the end of the iteration as opposed to the start. This is shown below:

Examples of all these loops can be found in the GitHub repository.

Naming Convention

Now we will take a look at the naming convention in Java. If you look through the code thus far you may be able to spot the convention yourself. For those who haven’t got it, or just want to know, the convention is as follows:

Function names – Start with lower case and should contain a verb, Example: findError()

  • Variable names – Start with lower case with subsequent words starting with a capital letter, Example: allAirports
  • Class names – Start with capital letter, Example: Main
  • Constant names – All uppercase, Example: MAX_ITEMS
  • Package names – All lowercase, with multiple words being separated by “.”, Example: neural.network

Access Modifiers

Next we will look at access modifiers of variables and methods. There are 4 access modifiers available in Java:

  • Default – The scope is then limited to the package only, meaning only classes in the same package can access it.
  • Private – The scope is then limited to that class only
  • Protected – The item is accessible by other classes in the same package AND any subclasses of those classes
  • Public – The item is accessible from anywhere!

You should pick your modifiers based on what your application is doing. More secure applications my require more private variables. Examples of the access modifiers can be found on the GitHub.

Comments

The last thing we’ll be covering is how to comment your code. Java has three different types of comment:

  • // – Used to comment out a single line.
  • /* */ – Used to comment out multiple lines.
  • /** */ – A JavaDoc comment (More on this later in the series)

Examples of these comments are shown throughout the screenshots and GitHub code, feel free to download it and experiment with it yourself.

Next Time

Next time we will be looking at commonly used and useful objects in Java.

Getting Started – Java

Java is one of the most popular languages in the world, due to its cross-platform nature and the ease of which its can be learned. It may not be as fast or as efficient as a language such as C or C++ but Java has many powerful features that make it a good starting language for many people.

Getting the Software

For this tutorial series we will be using the integrated development environment (IDE) called IntelliJ IDEA. You can find IntelliJ IDEA here: https://www.jetbrains.com/idea/

After you have downloaded the version appropriate for your operating system, run the installation so that you have it ready on your machine. The next step is going to be getting a Java development kit (JDK). You will have to install the JDK yourselves. This can be done by following the link here: https://www.oracle.com/technetwork/java/javase/downloads/jdk13-downloads-5672538.html

Select the version of the file you want and make sure to accept the “License Agreement”. Once the file is downloaded install the JDK and we’re ready to move to IntelliJ!

Creating the Project

Open IntelliJ and we’ll start by creating our first project. Make sure to set the SDK to the JDK we installed! If it doesn’t recognize the JDK, you’ll need to click “New” and find the file as shown below:

Then hit next until you reach the project naming screen:

Name it whatever you like and click “Finish”. Upon creating the project, we can now see the project view on the left, we’ll create a class in the “src” folder called Main. You do this by right-clicking the “src” folder and selecting “New > Java Class”.

Now with the Main class defined, we’ll add the main function to it:

All that remains now is to setup a run configuration, which can be done here:

Select the class as “Main” and make sure that the “JRE” is set to the same JDK you used. We now have the bare minimum to get started with Java!

Next Time

In the next post we’ll be going over variable declarations, loops and the naming conventions in Java. We’ll also be looking at access modifiers and commenting, so stay tuned!

Tutorials Incoming

What can you expect?

Initial tutorials on this blog will be about programming, particular Java, but I will also branch out into Python, R, C, C++ and possibly others as time progresses. I will be uploading the tutorials to YouTube and detailing the tutorials in text form here. Hopefully I can help at least one person learn to code.

How much will it cost?

Absolutely nothing. This blog is part of a project in my MSc, in which I take a digital marketing module where I have to plan and implement a blog, tracking the traffic and trying to increase the exposure the blog can get through various channels. So, with that being said, subscribing to the YouTube channel or the blog and sharing the content would be a great help but is not mandatory.

Hi I’m Sam

A student at the University of Reading, studying an MSc in Advanced Computer Science. Graduated with a BSc in Computer Science with First-Class Honours from the University of Reading.

Hello and welcome to the blog. I’m Sam and as stated above, I am a student at the University of Reading where I am currently studying for my MSc in Advanced Computer Science.

Why am I doing this?

As part of my studies, I am taking a digital marketing module, which requires me to create a plan for running a blog and increasing the traffic to it using marketing techniques and analytics. As I am not a marketer, nor do I have any experience marketing, this will be a steep learning curve for me.

I figured that, being a Computer Science student, a blog themed around my field would be the optimal choice. I then considered advertisements that I had seen online, “Learn to code”, or “Become a programmer”, which prompted me to take this project down the educational route. This decision was strengthened from previous work I had done on YouTube, where tutorial videos tended to get more traction and views than any other video.

The goal of the assignment is to strategise growth and then implement a few of the strategies put forward, hopefully having analytical data to prove that the strategy has worked to some degree.

As a result, likes, shares, comments and subscriptions to any or all of the content produced in this project would be much appreciated.

Design a site like this with WordPress.com
Get started