Last time we set up the IDE and the JDK so that we’re ready to create Java programs. In this tutorial we will be looking at declaring variables, loops and conditional statements, the naming convention in Java, access modifiers and how to comment your code. If you haven’t gone through that tutorial, I would strongly advise doing so to ensure you are all up to speed here.
Primitives in Java
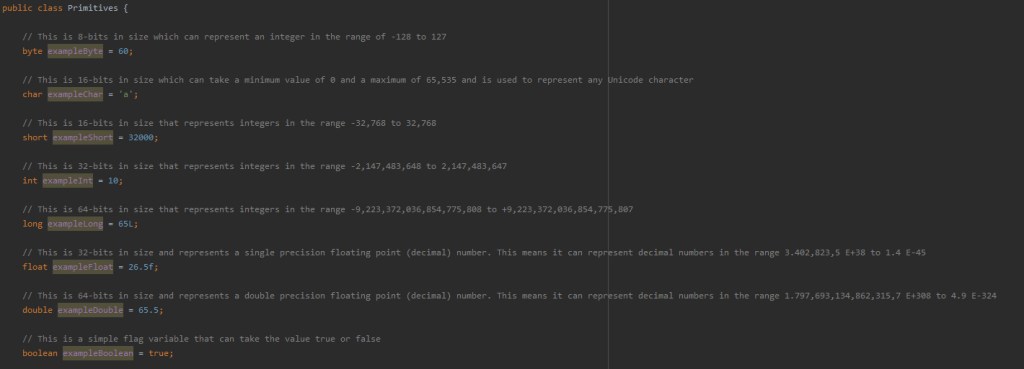
There are technically 9 primitive data types in Java, those being:
- byte – This is 8-bits in size which can represent an integer in the range of -128 to 127
- char – This is 16-bits in size which can take a minimum value of 0 and a maximum of 65,535 and is used to represent any Unicode character
- short – This is 16-bits in size that represents integers in the range -32,768 to 32,767
- int – This is 32-bits in size that represents integers in the range -2,147,483,648 to 2,147,483,647
- long – This is 64-bits in size that represents integers in the range -9,223,372,036,854,775,808 to +9,223,372,036,854,775,807
- float – This is 32-bits in size and represents a single precision floating point (decimal) number. This means it can represent decimal numbers in the range 3.402,823,5 e^38 to 1.4 e^-45
- double – This is 64-bits in size and represents a double precision floating point (decimal) number. This means it can represent decimal numbers in the range 1.797,693,134,862,315,7 e^308 to 4.9 e^-324
- boolean – This is a simple flag variable that can take the value true or false
- null – This represents a null value, useful if something doesn’t exist (Though we cannot declare a variable of type null)
Now that we’ve been introduced to the primitives in Java, let’s take a look at how these would look in Java:
The code for this example is all available on the GitHub (link at the top) so feel free to download it and have a play, or better yet follow along with the YouTube tutorial and make your own.
Variable Modifiers
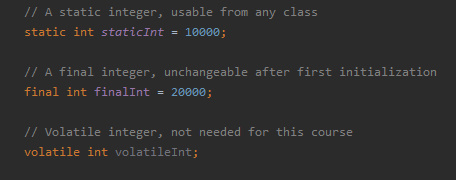
Variables can also have different modifiers that change the way they behave in a program. Those modifiers are:
- static – This can be used to create universal variables, that means you don’t need to create an object to use them
- final – This prevents the variable being reinitialized after the first initialization
- volatile – This aims to adress visibility problems with the variable
Whilst there are other modifiers in the Java language, only these three apply to variables in Java.
Conditional Statements
Next we will be taking a look at conditional or “control” statements in Java. They include:
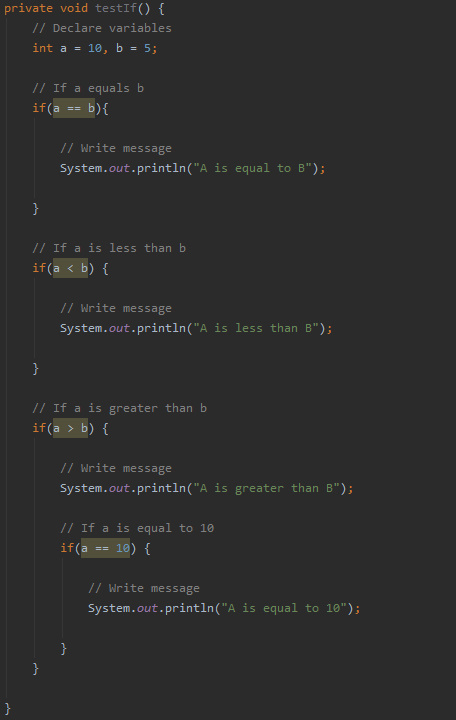
- if – This is used to specify whether a block of code should be executed depending on the condition being true.
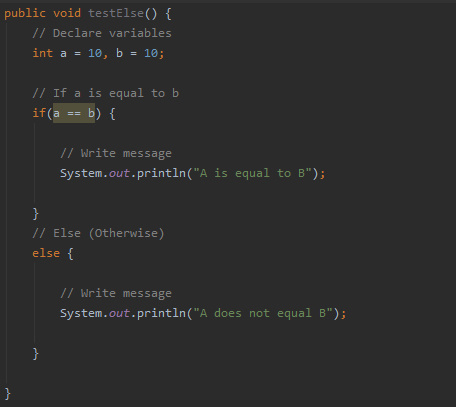
- else – This can be used in conjunction with an if statement, and will run if the condition is false.
- else if – This can also be used in conjunction with an if statement, and can be used to check a second condition if the prior checks have failed.
- switch – This is used to specify many alternative blocks of code that will be executed depending on the condition.
But all of these statements require the use of logical conditions:
- a < b – a is less than b
- a > b – a is greater than b
- a <= b – a is less than or equal to b
- a >= b – a is greater than or equal to b
- a == b – a is equal to b
- a != b – a is not equal to b
In addition to these conditions, you can chain conditions together using logical operators:
- && – AND
- || – OR
- ^ – XOR
Below is an example of an “if” statement. It checks if the condition is true, and if it is, it executes the code in its block.
Next is an example of an “else” which is used after the “if” statement we just saw:
Then the “else if”:

The “switch” statement has a completely different syntax, but don’t worry, it’s quite logical when you read it:
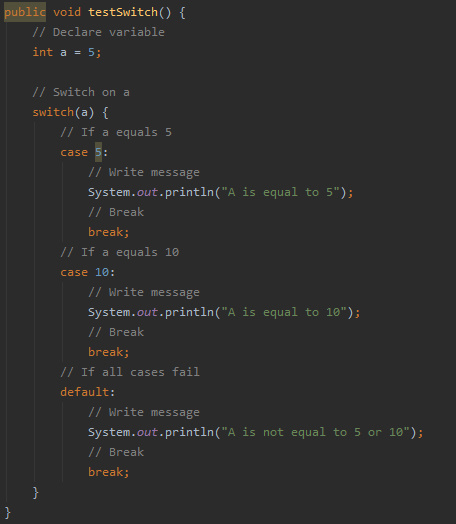
You can see that depending on what the input is, a different block of code will be executed. It is important to remember that you need to “break” after the block of code so that the program can exit the “switch” statement.
There is also the “default” branch, which executes if the “switch” doesn’t recognize the input.
Loops
Next we will be taking a look at loops in Java. There are three loops available in Java, those being:
- for loop
- while loop
- do while loop
The “for” loop is used to iterate over a set range of values, or even a collection of objects (we’ll get on to this in the future). You can see an example “for” loop below:
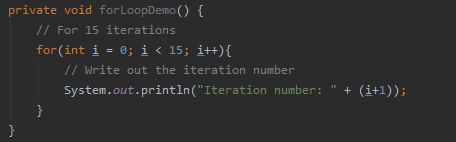
It works by declaring a variable (in this case “i”) and then specifying the stopping criteria of the loop in the form of a conditional. Lastly you have to define the step for the variable.
The “while” loop will iterate indefinitely until the condition changes. An example is shown below:

As you can see the loop will keep iterating until the boolean it is checking is updated.
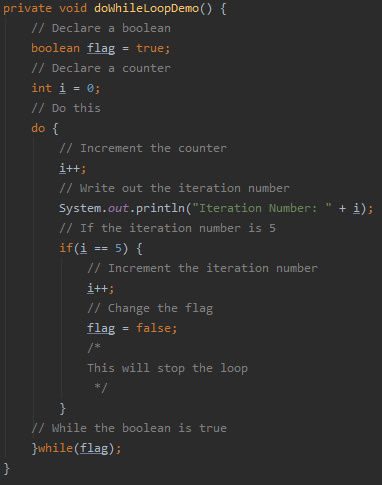
The “do while” loop is similar to the “while” loop, however this variant guarantees the loop will be executed at least once. This is because the condition checking is done at the end of the iteration as opposed to the start. This is shown below:
Examples of all these loops can be found in the GitHub repository.
Naming Convention
Now we will take a look at the naming convention in Java. If you look through the code thus far you may be able to spot the convention yourself. For those who haven’t got it, or just want to know, the convention is as follows:
Function names – Start with lower case and should contain a verb, Example: findError()
- Variable names – Start with lower case with subsequent words starting with a capital letter, Example: allAirports
- Class names – Start with capital letter, Example: Main
- Constant names – All uppercase, Example: MAX_ITEMS
- Package names – All lowercase, with multiple words being separated by “.”, Example: neural.network
Access Modifiers
Next we will look at access modifiers of variables and methods. There are 4 access modifiers available in Java:
- Default – The scope is then limited to the package only, meaning only classes in the same package can access it.
- Private – The scope is then limited to that class only
- Protected – The item is accessible by other classes in the same package AND any subclasses of those classes
- Public – The item is accessible from anywhere!
You should pick your modifiers based on what your application is doing. More secure applications my require more private variables. Examples of the access modifiers can be found on the GitHub.
Comments
The last thing we’ll be covering is how to comment your code. Java has three different types of comment:
- // – Used to comment out a single line.
- /* */ – Used to comment out multiple lines.
- /** */ – A JavaDoc comment (More on this later in the series)
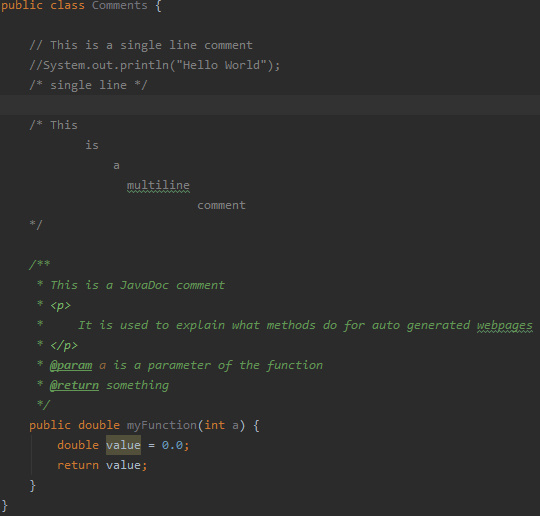
Examples of these comments are shown throughout the screenshots and GitHub code, feel free to download it and experiment with it yourself.
Next Time
Next time we will be looking at commonly used and useful objects in Java.
